By Naoufal E., Squad Experts
“Tricks make you save time to Code & Deploy your Terraform Config File Easily”
As a Software Architect or a FullStack-Developer (someone with a developer background), I always had this fear of the syntax of Terraform configurations (HashiCorp Configuration Language: HCL).
Every time I read an example of a file with this syntax I couldn’t understand anything and I didn't know why.
However, I figured out why: “it was because my brain was formatted or programmed about how to design software, how to make an algorithm to solve a problem, etc … And nothing else”, so I tried to understand the Terraform config file with this mindset and I complicated my understanding of a simple configuration language (HCL),
I wrote this story to share with you Tips & Tricks for a better understanding and deploying Terraform by implementing S3M Pattern that I wrote before.
To understand better the implemented example, please refer to my previous story
Prerequisite:
→ AWS Account
→ AWS Programatically Acount with Programmatic access and Admin Permission
→ AWS CLI configured in your laptop (if you want to run your infra from you laptop (~/.aws/config )
→ A better understanding of S3M Pattern
Terraform: What? Why? How?
What Is Terraform?
Is an IaC Software Tool 😲 →Infra as Code Software Tool 😳→ A software that allows us to code our InfraStructure 😜.
Coding infra may be done with two methods: Imperative (How) or Declarative (What) or both together.
Imperative :
- Focuses on How the infrastructure must be done
- Defines specific commands that need to be executed in the appropriate order to end with the desired conclusion
Declarative :
- Focus on What the eventual target configuration should be
- Defines the Desired State and the system executes what needs to happen to achieve that Desired State
And Terraform is Declarative, so now you know why as a software architect, I complicated things, my mind was always focusing on How (always designing how), but if you need to understand easily Terraform you should switch your mind on What and everything will become too easy 😉
Why should we use it?
Terraform makes a great tool when it comes to DevOps & Portability. There are the reasons to consider Terraform as one of your IaC tools :
- Portability: This is the big problem that Terraform Solves: it makes it easy to Duplicate Infra in different environments (DEV, PRE, PROD) at the same Cloud Provider. Also and because Terraform is completely platforms agnostic, it facilitates the coding resources of the new Cloud Provider if the company decides to change it Cloud Provider.
- Terraform lets you define infrastructure in a config file and will enable you to track changes to infrastructure with ease by having your code in source control (Git), building it, and deploying it.
- Terraform has a lively community and is open source, there is a massive community developing around this tool. Many people are already using it, and it’s easier to find people who know how to use it, plugins, extensions, professional support, etc. This also means Terraform is evolving at a much faster rate. They do releases very often.
- Terraform’s speed and operations are exceptional. One cool thing about Terraform is, its plan command lets you see what changes you’re about to apply before you apply them.
How to Use it?
- Download the latest version and install it
- Choose a folder and Create a file with .tf extension and write this simple example :
# Declare wish provider you want to use
provider "aws" {
   region = "us-east-2"
}
# Declare a VPC
resource "aws_vpc" "s3m-vpc" {
    cidr_block = "10.0.0.0/16"
    enable_dns_hostnames = true
     tags = {
    "project" = "S3M"
    "tuto"="medium"
  }
}
In the same folder open a terminal and run these commands
terraform init
This command is to download all dependencies for your cloud provider (like npm install or dotnet restore for developers lol )
terraform plan
This command is for creating an execution plan. Terraform performs a refresh, unless explicitly disabled, and then determines what actions are necessary to achieve the desired state specified in the configuration files.
You can skip this command and apply directly your IaC, but is recommended to see what you have in your plan and fix errors or bugs before applying your infra
terraform apply
The
terraform applycommand is used to apply the changes required to reach the desired state of the configuration, or the pre-determined set of actions generated by aterraform planexecution plan.
- You can now go to your account and verify if the VPC is created in the us-east-2 region
- And finally, to destroy what are you created, you can run this command :
terraform destroy
Tips to implement Terraform on Complex Architectures
In this section, I’ll give you some tips & tricks to save your time when coding the infra of a Complex Architecture.
As an example, we will take the S3M Pattern that I wrote before. As a reminder this the architecture :
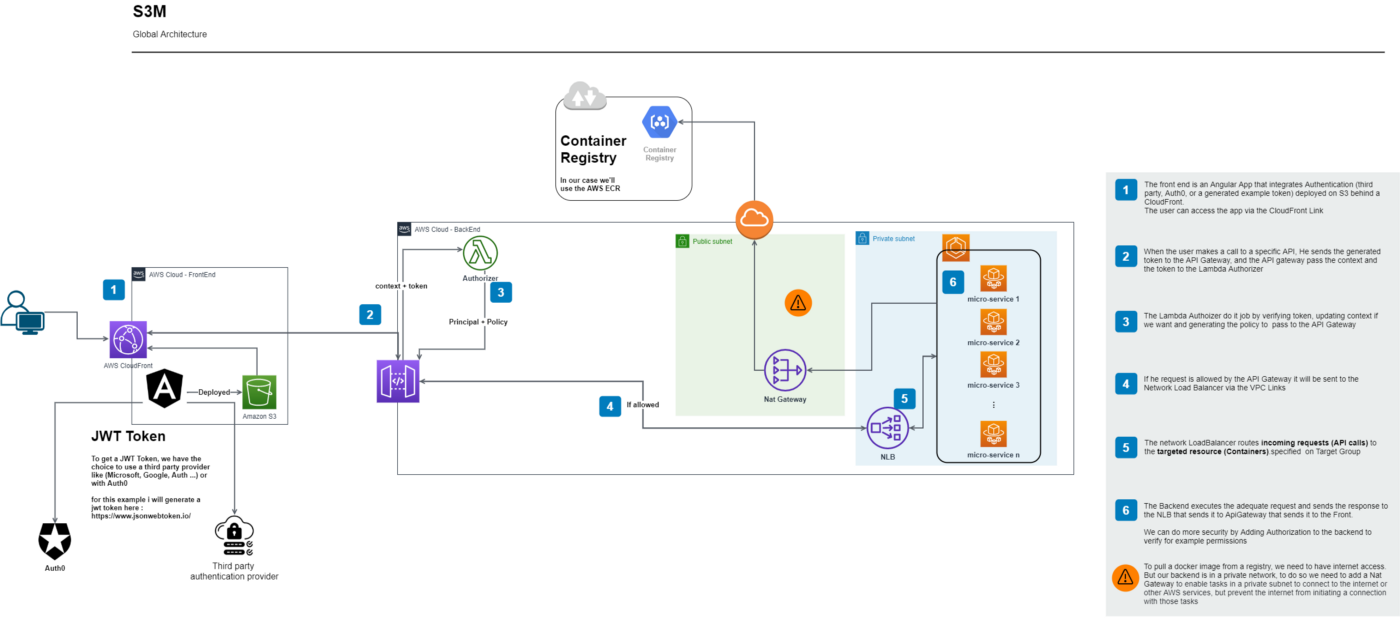
Tip 1: To-Do Liste of What we want 😜 :
As you can see, for this pattern we need these blocks:
- VPC with three subnets (two privates and one public)
- APIGateway with VPC Link
- Authorizer (Lambda and API Gateway)
- ECS Cluster Fargat with TaskDefinition and Service
- NLB (Network Load Balancer with a TargetGroup)
- S3 For Static Web Site Hosting
Tip 2: Create a *.tf file for each block😄:
- vpc.tf
- api-gateway.tf
- authorizer.tf
- cluster.tf
- load-balancer.tf
- s3.tf
- To properly organize our code, we can make also a folder for different policies (JSON files)
Tip 3: The Magic of Copy-Past 😅
- Open the Terraform Documentation for AWS
- For each file: copy-past the configuration and adapt it like the image below:
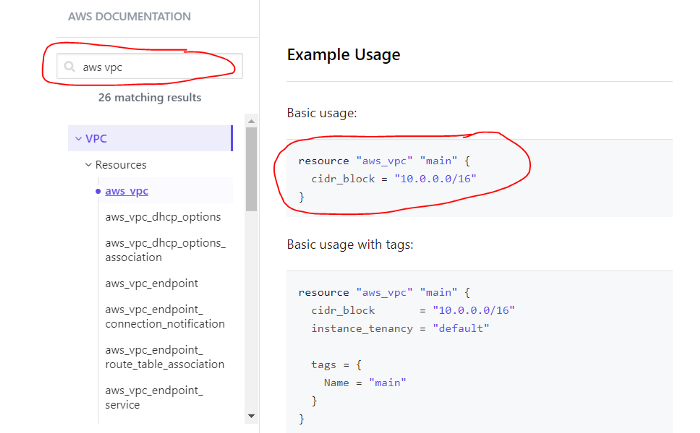
So, for example, the vpc.tf file will look like this if we implement it with the S3M Pattern:
# Declare a VPC
resource "aws_vpc" "s3m-vpc" {
    cidr_block = "10.0.0.0/16"
    enable_dns_hostnames = true
     tags = {
    "project" = "S3M"
    "tuto"="medium"
  }
}

# Declare all availabilities zones.
# Declare 1st Availability Zone
resource "aws_subnet" "s3m-public" {
    vpc_id = aws_vpc.s3m-vpc.id
    cidr_block = "10.0.1.0/24"
    availability_zone = var.availability_zone_1
     tags = {
    "name"="s3m-public"
    "project" = "S3M"
    "tuto"="medium"
  }
}
# Declare 2nd Availability Zone
resource "aws_subnet" "s3m-private-1" {
    vpc_id = aws_vpc.s3m-vpc.id
    cidr_block = "10.0.2.0/24"
    availability_zone = var.availability_zone_2
    tags = {
    "name"="s3m-private"
    "project" = "S3M"
    "tuto"="medium"
  }
}
# Declare 3rd Availability Zone
resource "aws_subnet" "s3m-private-2" {
    vpc_id = aws_vpc.s3m-vpc.id
    cidr_block = "10.0.3.0/24"
    availability_zone = var.availability_zone_3
    tags = {
    "name"="s3m-private"
    "project" = "S3M"
    "tuto"="medium"
  }
}

# Declare the Internet Gateway
resource "aws_internet_gateway" "s3m-igw" {
    vpc_id = aws_vpc.s3m-vpc.id
}

# Declare the elastic IP for the nat Gateway
resource "aws_eip" "s3m-eip_nat_gateway" {
  vpc = true
}

# Declare the Nat Gateway
resource "aws_nat_gateway" "s3m-ngw" {
  allocation_id = aws_eip.s3m-eip_nat_gateway.id
  subnet_id     = aws_subnet.s3m-public.id
  tags = {
    "project" = "S3M"
    "tuto"="medium"
  }
}

# Update the defaultroute table
resource "aws_default_route_table" "s3m-rt-public" {
default_route_table_id = aws_vpc.s3m-vpc.default_route_table_id
route {
        cidr_block = "0.0.0.0/0"
        gateway_id = aws_internet_gateway.s3m-igw.id
    }
}

# Declare a private route table for private networks
resource "aws_route_table" "s3m-rt-private" {
    vpc_id = aws_vpc.s3m-vpc.id
    route {
        cidr_block = "0.0.0.0/0"
        nat_gateway_id = aws_nat_gateway.s3m-ngw.id
    }
}

# Declare the association between private subnets and private route table
# First Private Subnet
resource "aws_route_table_association" "s3m-rta-private-1" {
    subnet_id = aws_subnet.s3m-private-1.id
    route_table_id = aws_route_table.s3m-rt-private.id
}


# Second Private Subnet
resource "aws_route_table_association" "s3m-rta-private-2" {
    subnet_id = aws_subnet.s3m-private-2.id
    route_table_id = aws_route_table.s3m-rt-private.id
}
If you are asking: what about the fulfillment’s order ?! Should we start with VPC, ECS, APIGateway or…?
Answer : Is not your problem 😝, you don’t need to care about this😃, your job is to Describe, and Terraform Job is to Define the best way to execute your staff 😉
DevOps Philosophy
Definition
What is really DevOps? DevOps is not a job title 😠, in fact, it is a set of practices that combines software development (Dev) and IT operations (Ops).
DevOps initiatives can create cultural changes in companies by:
- Transforming the way operations, developers, and testers collaborate during the development and delivery processes 😃.
- Getting these groups to work cohesively is a critical challenge in enterprise DevOps adoption 😃.
- DevOps is as much about the culture, as it is about the toolchain.
So when some companies are looking for a DevOps engineer within their workflows, it means that they are not ready to change their philosophy and culture, and this may just deepen the disconnect between developers and operational teams 😅.
Toolchains
DevOps tools fit into one or more activities, which supports specific DevOps initiatives: Plan, Create, Verify, Package, Release, Configure, Monitor, and Version Control. For more info click here
I’ll keep it simple in this story by focusing on these tools: Create (Code), Package (Artifact), Release (Deploy), Configure (IaC), Version Control.
Automatize all with GitHub Actions: (Get your Hands Dirty)
Now that you know what are Terraform & DevOps about, let make some automatization to Package, Release and Configure the delivery process of the Backend, FrontEnd, and IaC (Config) with GitHub Actions
GitHub Actions makes it easy to automate all our software workflows with CI/CD. we will use it to Package, Release, and Configure our code right from GitHub.
Prerequisites:
→ GitHub Account: you will need a GitHub account to clone my repo examples in yours to automatize and build pipelines
→ Terraform Free Account: Explained in IAC Repository below
For the automatization I make 3 Pipeline, one for each Repository:
As you can see, for each Repo I have a Yaml file that exists in /.github/workflows. This file will be interpreted by the Action Workflow of GitHub to run a pipeline that builds and deploys.
All Yaml files are well commented for a better understanding 😃
- For IaC: The pipeline will simply apply our infra
- For API: The pipeline will containerize our package in a docker image and push it to Ecr Repo
- For Static web Site: The pipeline will build our Angular project and deploy it to S3 Static web Hosting
IaC Repository :
To automatize the deployment of your Terraform IaC code, firstly you should create a free account with Terraform and follow these steps.
1- Create Your Organization
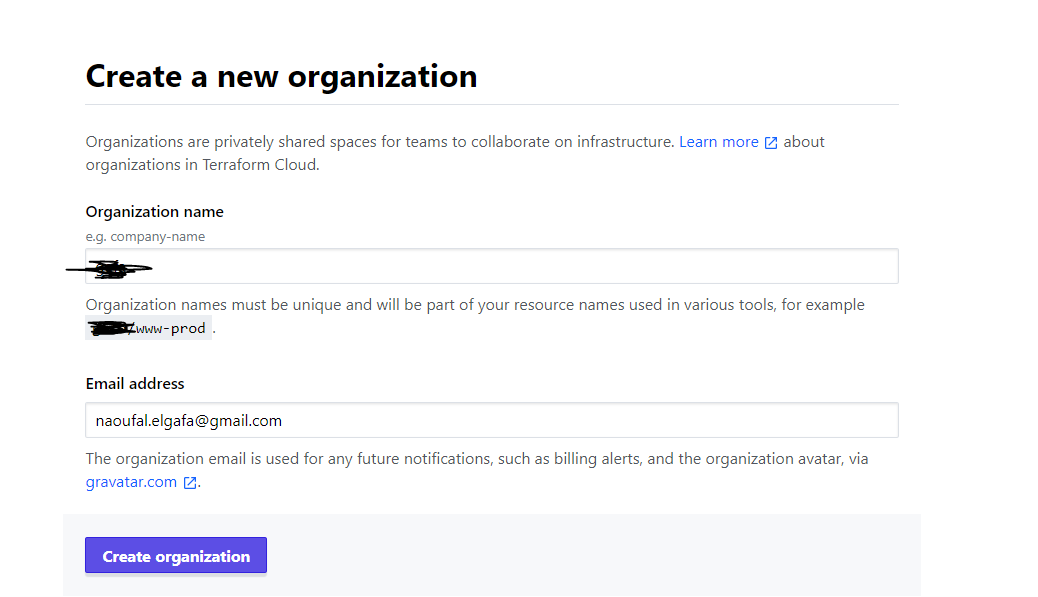
Once the organization created, it’s time to create the workflow
2- Create The Workflow
To do so, click on API-driven workflow as shown in the image below and create your workflow
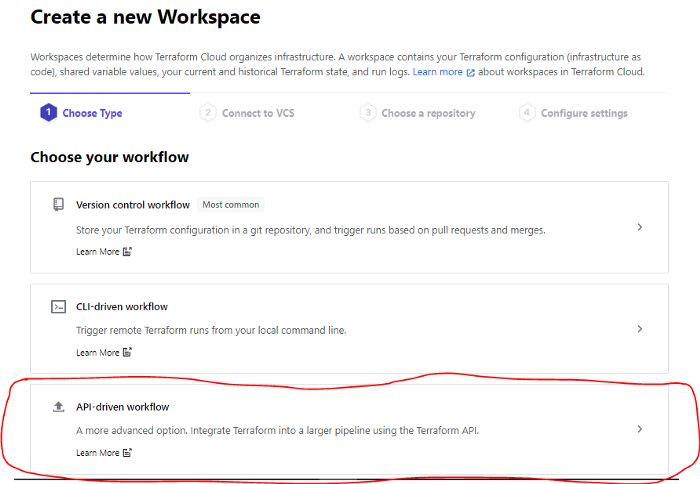
Name your workspace and create it
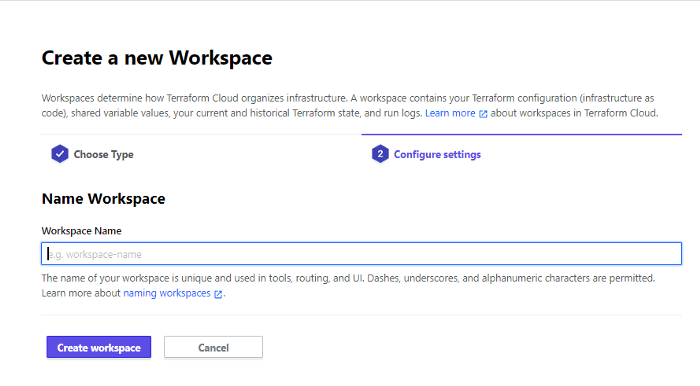
Once the workspace is created, terraform will generate for you this code to use in your main config file (main.tf) that exists in your repository.
So, copy-paste this code (a full example can be found in my repo)
terraform {
  backend "remote" {
    organization = "your organization name"workspaces {
      name = "your workspace name"
    }
  }
}
3- Generate a Terraform Cloud User API token:
- Go to: https://app.terraform.io/app/settings/tokens and click on “Create an API token”

- Give it a description to help you identify this token later and click on “Create API token”
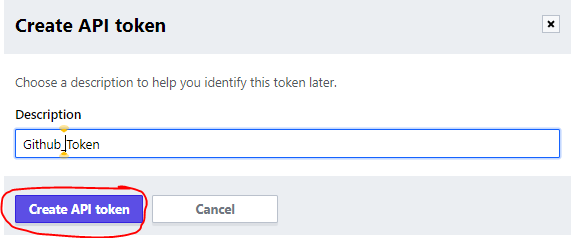
- Copy the generated token
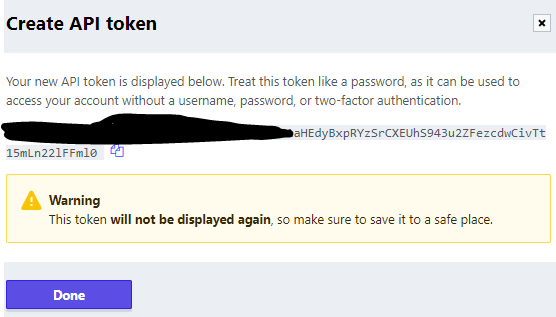
4- Store the generated token as a GitHub secret on the IaC Repository:

You can follow the GitHub Docs here.
5- Store the AWS Keys on Terraform Cloud Environment Variables :
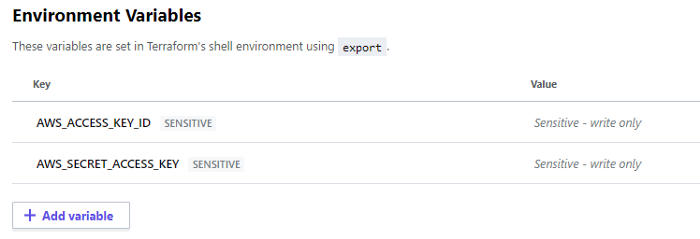
We need to save our AWS Access Key and Secret Key on Terraform Environment Variable, so when the Github pipeline run, it will use these credentials to Plan and Apply our infra to the AWS Account.
To do so go to https://learn.hashicorp.com/tutorials/terraform/cloud-workspace-configure and follow the steps bellow
- Add Environment Variables
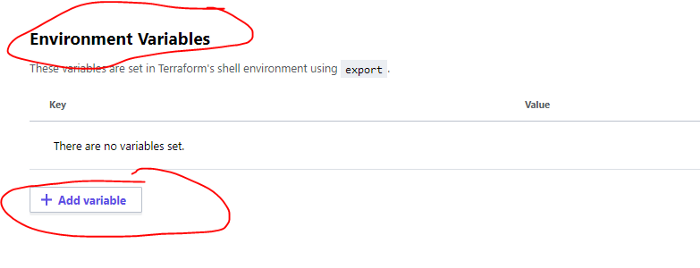
- Create these two environment variables and make them sensitive:
For more info about managing secrets on Terraform, you can follow this Blog
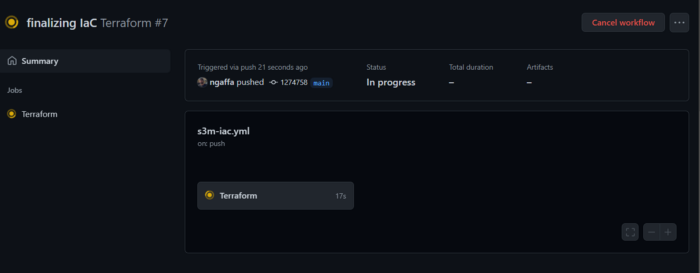
6- Run your pipeline on GitHub
API Repository :
After the deployment of our Infrastructure, now it’s time to deploy our API, otherwise, the pipeline will simply push a docker image into ECR (that’s all 😄)
Don’t forget to add the AWS_ACCESS_KEY_ID and AWS_SECRET_ACCESS_KEY in the secret of your API Repository, and run the pipeline via the GitHub Action Tab
The full example can be found here

Static Web Site Repository :
Because we did not attach a custom domain name to our API Gateway we should copy the EndPoint generated by our IaC Deployment and past it to the environment variable of the Static Web Site
Another option more complicated is to store the environment variable in a Configuration Manager like (AWS secrets manager) or use a Cloud Agnostic Tools like SOPS
1- Go to your APIGateway Dashboard, click on the created API, go to Stages and copy the endpoint

2- Go to your Static WebSite Repository, update the environment file and make a commit

3 - Run your Pipeline (Don’t forget to add the AWS_ACCESS_KEY_ID and AWS_SECRET_ACCESS_KEY in the secret of your API Repository, and run the pipeline via the GitHub Action Tab)
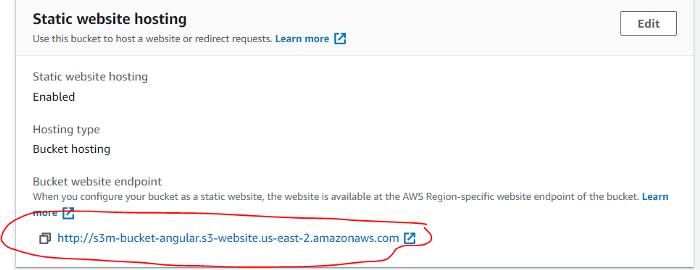
4 - Check if everything works by going to your s3 static web site Endpoint, copying the link, pasting it to your browser, and clicking on the “Get weather” button
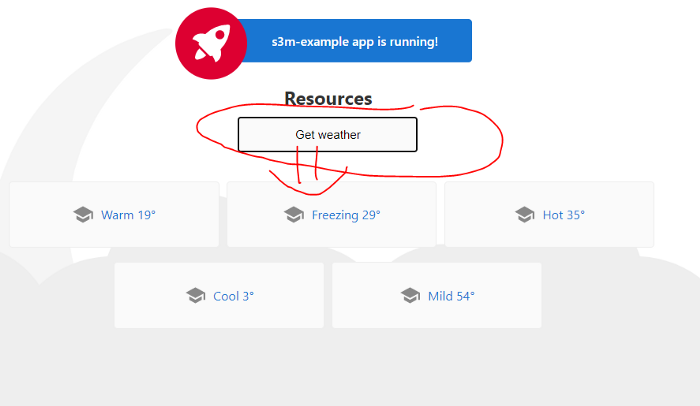
Greaaaaaaaaaat, everything automatized and worked like magic 😄
Conclusion
In real life, coding and managing the source code of the Infra is such a great thing because it allows the Company Architect to follow all changeset and apply only the changes without destroying all the infra architecture.
In real life, coding and managing the Infra source code is such a great thing as it allows the company architect to keep up with all the changes and apply only the necessary updates without destroying the entire system.
The IaC philosophy also facilitates the portability of the Infrastructures:
- Between different clouds provider
- Between different environment of the same cloud provider
When we tied IaC with real DevOps philosophy, we save much more the time of process delivery while keeping a better quality of code.
If you are new to these technologies (AWS, IaC, DevOps), this blog will help you understand the sequence of the different bricks (AWS, IaC, DevOps) and will prevent you from following many tutorials and going in all directions.
I wish to thank by the way Soufian Belehrache for his technical advice.
If you have any remarks, or if something doesn’t seem clear, please leave a comment or contact me on my Fb Page, Twitter, or via my website
Finally, I have a challenge for you:
- Create a GitHub account if you don't already have one
- Create a Terraform Free Account
- Apply what are you learned in this Story “Section Automatize all with GitHub Actions: (Get your Hands Dirty)”
- Good luck
See you at the next Story ✌️.


